Stores in svelte can be very powerfull and can unlock the doors to unlimited possibilities.
In this article, I'll guide you through the integration of Firebase with SvelteKit, leveraging the power of stores to create robust patterns for both authentication and Firestore data management. This approach will empower you to build powerful and scalable web applications efficiently.
The code reported is inspired by fireship library sveltefire, which I highly raccomend to check out.
But First what the hell is a store?
With the word store we refer to a a state management library which allows us to use state in our application from a single centralized object.
Let me explain. State is just a fancy word for data; any type of variable or data is a state. Usually in a normally application the only way to pass data from a parent component to a children is props and that’s ok for small applications.
But what if the most top component want to pass data to the most bottom one? You could pass props to all your component and that pattern is called props drilling; something that we usually want to avoid. Here’s an example
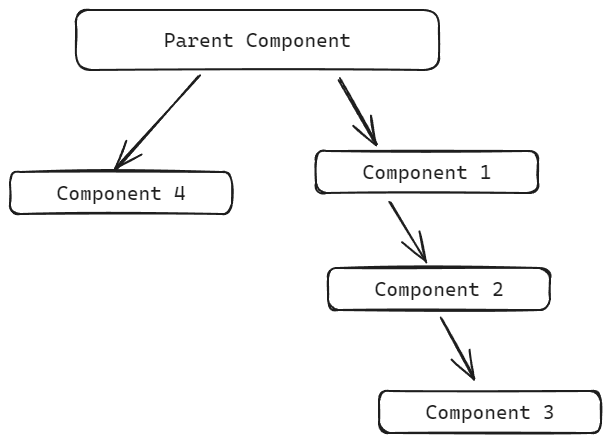
If parent component wants to share a piece of state with comp. 3, the data has to pass through comp. 1, comp. 2 and then 3, which is really inefficient. What if comp.4 wants to share data with comp. 1? How can we achieve that?
Fortunately there are state managment libraries that allow us to store a piece of state in a different place where all the component can easily access. Here’s an example

The store shares the data with all the components and this data is updated in real-time for all the components which subscribe to it.
How do we use stores in svelte
Svelte has a pretty neat solution for that. Infact svelte provides us writables.
In the lib folder we can create a file called whatever you want and import writable from ‘svelte/store’
import { writable, type Writable } from "svelte/store";
const counter: Writable<number> = writable(1);
That’s all it takes to create a store in svelte. Now we can export and use it in all the svelte files we have. Here’s an example:
<script lang="ts">import { counter } from "$lib/store";
</script>

<button>{$counter}</button>
To access the real-time value of the store it’s as easy as put a dollar sign in front of the store’s name.
Let’s now see how we can change its value. We have two methods: update and set. As the name suggests update allows us to update the store’s value based on the one it had before and set allows us to set the value regardless of the one it had before.
<script lang="ts">import { counter } from "$lib/store";
function update() {
  counter.update((prevCounter) => {
    return prevCounter * 2;
  });
}
function set() {
  counter.set(10);
}
</script>

<button>{$counter}</button>
<button on:click={update}>Double</button>
<button on:click={set}>Set to 10</button>
There are many other types of stores in svelte such as readable, derived, readonly and the the get function
Readable
Readable are stores that can’t be changed from outside. The only way to update them is from a second argument (a callback function) that is triggered as soon as the store is created.
import { readable } from "svelte/store";

export const readableCounter = readable(0, (set) => {
  set(Math.random());
});
This set function is available in the writable as well.
Derived
Derived store behave just as the name suggests. They create a new store based on the value of another’s. This accepts to arguments: a store and a function that runs everytime the first store’s value changes.
import { writable, derived } from "svelte/store";

const counter = writable(0);
export const doubleCounter = derived(counter, ($counterval) => {
  return $counterval * 2;
});
You can also do asynchronous stuff in there, by accepting a second argument in the callback function set and also a third update function. These work the same way of normal writable:
import { writable, derived } from "svelte/store";

const counter = writable(0);
export const doubleCounter = derived(counter,($counterval,set,update)=>{
  set($counterval * 2);
  setTimeout(() => {
    update((counter) => counter * 4);
  }, 5000);
});
Readonly
Readonly are very similar to readable but this can’t be changed not even by himself. This means the set function isn’t available and the value just can’t change. We use this to make a normal store into a readonly one that can’t mutate.
import { writable, readonly } from "svelte/store";

const counter = writable(0);
export const readonlyCounter = readonly(counter);
Get
Lastly we have the get function that is simply used to get a store’s value by subscribing and immediatly unsubscribing by it. We can use it in ts function where the store’s value can’t be accessed by the dollar sign.
import { get, type Writable } from "svelte/store";

export function returnStoresValue(store: Writable<number>) {
  return get(store) * 2;
}
All these examples are on this repl. After this brief explanation let’s start with the real project
Firebase setup
Let’s first go to firebase console and create a new project. After that in the terminal let’s type:
npm create svelte@latest svelte-firebase-storeselect Skeleton Project and run :
npm install && npm install firebaseThe first thing to do is create a firebase.ts file in the lib folder. We are going to import initializeApp and we are going to paste the configuration we got from firebase.
After that let’s import getAuth from firebase/auth , get the two properties and export them so we can reuse them in other part of our application.
import { initializeApp } from "firebase/app";
import { getAuth } from "firebase/auth";

const firebaseConfig = {
  apiKey: "***",
  authDomain: "***",
  projectId: "***",
  storageBucket: "***",
  messagingSenderId: "***",
  appId: "***",
};

const app = initializeApp(firebaseConfig);
export const auth = getAuth(app);
Auth store
In a new file auth.ts, let’s create a function and generate a new writable store from svelte/store. We are going to extract the subscribe method from the writable and return it from the main function. The default value for the store is going to be
function authStore() {
  const { subscribe } = writable(auth.currentUser ?? null, (set) => {});
  return {
    subscribe,
  };
}
In the callback function we’ll invoke the onAuthStateChanged method from firebase/auth which is triggered whenever the user state changes (sign-in, sign-out, etc…). This function accepts a callback function as well, with the user as parameter.
onAuthStateChanged(auth, (user) => {});This all combined should look like something like this:
function authStore() {
  const { subscribe } = writable(auth.currentUser ?? null, (set) => {
    onAuthStateChanged(auth, (user) => {});
  });
  return {
    subscribe,
  };
}
In the onAuthStateChanged callback function we can call the set method passing the user as value.
const { subscribe } = writable(auth.currentUser ?? null, (set) => {
  onAuthStateChanged(auth, (user) => {
    set(user);
  });
});
It’s a best practise to unsubscribe from onAuthStateChanged to prevent memory leaks. Let’s create a variable and store the unsubscribe function returned by onAuthStateChanged:
function authStore() {
  let unsubscribe: any;
  const { subscribe } = writable(auth.currentUser ?? null, (set) => {
    unsubscribe = onAuthStateChanged(auth, (user) => {
      set(user);
    });

    return () => unsubscribe();
  });
  return {
    subscribe,
  };
}
To complete this let’s just check is we are working in the broswer with a simple if statement
if (!auth || !globalThis.window) {
  console.warn("Auth is not initialized or not in browser");
  const { subscribe } = writable<User | null>(null);
  return {
    subscribe,
  };
}
Now, we can export a variable ‘user’ which is equal to authStore(). The whole function is this:
import { writable } from "svelte/store";
import { auth } from "./firebase";
import { onAuthStateChanged } from "firebase/auth";

function authStore() {
  let unsubscribe: any;

  if (!auth || !globalThis.window) {
    console.warn("Auth is not initialized or not in browser");
    const { subscribe } = writable(null);
    return {
      subscribe,
    };
  }
  const { subscribe } = writable(auth.currentUser ?? null, (set) => {
    unsubscribe = onAuthStateChanged(auth, (user) => {
      set(user);
    });

    return () => unsubscribe();
  });
  return {
    subscribe,
  };
}

export const user = authStore();
The function is completed, let’s use this in a dedicated component.
Authcheck component
In the lib folder create a component called AuthCheck.svelte and import the user store previously created. With just an if check we can either render the protected info or redirect to the login page.
We can also pass the user in case it available with slot props
AuthCheck.svelte:
<script lang="ts">import { user } from "./auth";
</script>

{#if $user}
  <slot user={$user} />
{:else}
  <slot name="login" />
{/if}
Now we can use in the +page.svelte or in the +layout.svelte in this way
<script lang="ts">import AuthCheck from "$lib/AuthCheck.svelte";
</script>

<AuthCheck let:user>
  <h1>Some protected info</h1>
  <h1>Hi { user.displayName }</h1>
  <div slot="login">
    <a href="login">Please signup</a>
  </div>
</AuthCheck>
If you want you can also include your signup logic in the store and export it like a normal function.
Stores for Firestore
This is for the auth part, we can also use this for the firestore database using stores and the onSnapshot function.
First of all let’s import getFirestore and initialize in the firebase.ts file and export it as done previously with the auth.
For this example we are going to use a collection of posts with the uid, post title, and description.
We can do the same thing as before: create a posts.ts file, create a function postsStore and create a writable store in it.
function postsStore(collectionName: string) {
  const { subscribe } = writable([], (set) => {});

  return {
    subscribe,
  };
}
in the writable callback function let’s use the onSnapshot firebase function for create a real time data fetching from the database
function postsStore() {
  const { subscribe } = writable([], (set) => {
    onSnapshot(collection(firestore, "posts"), (snapshot) => {
      const posts: any = [];
      snapshot.forEach((post) => {
        posts.push({ ...post.data(), id: post.id });
      });

      set(posts);
    });
  });

  return {
    subscribe,
  };
}
Now we can export this store as well :
export default postsStore;Back in the +page.ts we can access the store value and cycle trought it.
<script lang="ts">import posts from "$lib/posts";
const postsStore = posts();
</script>

{#each $postsStore as post}
  <h1>{post.post_title}</h1>
  <h1>{post.description}</h1>
{/each}
Now all the changes in the database will be instantly reflected in the ui.
If you want you can make this reusable by passing it the name of the collection.
Post component
We can still take this a step further by putting these stores in components and use svelte slot properties.
Let’s create a component called Posts.svelte. In this file we’ll import the postsStore store and pass the slot component the posts.
<script lang="ts">import postsStore from "./posts";
const posts = postsStore();
</script>

<slot posts={$posts} />
In the +page.svelte we can now use the component and retrive the data
<Posts let:posts>
    {#each posts as post}
        <h1>{post.post_title}</h1>
    {/each}

</Posts>
As you can see we achieved the same goal in a much more elegant way. As I said if you wanted to make this reusable for multiple collections you would just pass the Posts component a prop with the collection name and the same in the store, that’s it.
<Collection collectionName="posts" let:data>
  {#each data as info}
    <h1>{info.name}</h1>
  {/each}
</Collection>
Conclusion
In conclusion, we’ve delved into just a few of the myriad possibilities that Svelte stores open up. Beyond authentication and Firestore, you can craft diverse components like paginators, toast libraries, and more. I hope that the concepts presented were clear and that you found this journey into Svelte store functionality helpful. Now, armed with these tools, go ahead and unleash your creativity in building a variety of features for your SvelteKit projects. Happy coding!